Report 607013011/2010
W. Verweij | A.M. Durand | J.L. Maas | E. van der Grinten
Protocols belonging to the report
‘Toxicity measurements in concentrated
water samples’
RIVM Report 607013011/2010
Protocols belonging to the report ‘Toxicity
measurements in concentrated water samples’
W. Verweij
A.M. Durand, Waterschap Velt en Vecht, Coevorden J.L. Maas, Centre for Water Management, Lelystad E. van der Grinten
Contact: Wilko Verweij
Laboratory for Ecological Risk Assessment wilko.verweij@rivm.nl
This investigation has been performed by order and for the account of Ministry of Housing, Spatial Planning and the Environment, within the framework of project M/607013 ‘Bioassays’ and of the Directorate-General for Public Works and Water Management, within the framework of project C243.0003 ‘Bioanalyse’.
© RIVM 2010
Parts of this publication may be reproduced, provided acknowledgement is given to the 'National Institute for Public Health and the Environment', along with the title and year of publication.
Abstract
Protocols belonging to the report ‘Toxicity measurements in concentrated water samples’ This report contains protocols for bioassays, i.e. technical descriptions of how bioassays should be carried out. Using this information, researchers can perform these methods in exactly the same way as the Dutch RIVM and Centre for Water Management.
Bioassays use living organisms to gain insight in water quality, in contrast with chemical methods. An earlier report (RIVM-report 607013010 and Centre for Water Management report 2009.003)
summarised the information about bioassays, but the protocols were still missing. The current report fills this gap.
Rapport in het kort
Protocollen behorend bij het rapport ‘Metingen van toxiciteit in geconcentreerde watermonsters. Evaluatie en validatie’
Dit rapport bevat protocollen voor bioassays, oftewel de technische beschrijvingen hoe zij moeten worden uitgevoerd. Met deze informatie kunnen onderzoekers de methoden op exact dezelfde manier uitvoeren als het RIVM en de Waterdienst.
Bioassays zijn methoden die in tegenstelling tot chemische methoden, met behulp van levende organismen inzicht geven in de waterkwaliteit. In een eerder rapport (RIVM-rapport 607013010 en Waterdienst-rapport 2009.003) is de bestaande informatie over bioassays samengevat, maar de protocollen ontbraken nog. Dit rapport voorziet in deze lacune.
Contents
Summary 13
1 Introduction 15
2 Sampling and preservation of surface water for use in toxicity tests 17
2.1 Subject 17
2.2 Area of application 17
2.3 Principle 17
2.4 Terms and definitions 17
2.5 Reagents and additives 17
2.6 Equipment 18
2.6.1 Sampling (manual) 18
2.6.2 Sampling (automatic) 18
2.7 Sampling method 18
2.8 Preservation of surface water samples 19
2.9 Reporting 20
2.10 Quality assurance 20
2.11 Safety 20
2.12 Maintenance 20
2.13 References and additional information 20
2.14 Sampling form 21
3 Sample pretreatment for use in toxicity tests 23
3.1 Subject 23
3.2 Area of application 23
3.3 Terms and definitions 23
3.4 Principle of water sample conversion 23
3.5 Reagents and additives 23
3.6 Equipment 24
3.7 Pretreatment of XAD resins 24
3.8 Method 25
3.8.1 XAD extraction 25
3.8.2 XAD elution using acetone 25
3.8.3 Conversion of acetone eluate to water concentrate (KD distillation) 25
3.9 Calculating concentration factor 26
3.10 Reporting 26
3.11 Quality assurance 27
3.12 Safety 27
3.13 Maintenance 27
3.14 References and additional information 27
3.15 Sample form for sample pretreatment 28
4 Toxicity test using luminescent bacteria 29
4.1 Subject 29
4.2 Area of application 29
4.3 Terms and definitions 29
4.4 Principle of the test 29
4.6 Equipment 30
4.7 Reference substance 31
4.8 Preparing for the test 31
4.8.1 Preparing for the test (environmental samples) 31
4.8.2 Preparing for the test (quality test) 31
4.9 Microtox™ method 31
4.9.1 Preparing the test organisms 31
4.9.2 Equipment settings 32
4.9.3 Test implementation 32
4.10 Microtox™ colour correction 33
4.11 LUMIStox™ method 33
4.11.1 Preparing the test organisms 34
4.11.2 Equipment settings 34
4.11.3 Test implementation (DIN with 9 dilutions) 34
4.12 Parameters 35
4.13 Validity criteria 35
4.14 Statistical processing 35
4.15 Reference substance toxicity 36
4.16 Reporting 36
4.17 Quality assurance 36
4.18 Safety 36
4.19 Maintenance 37
4.20 References and additional information 37
4.21 Vibrio fischeri sample data and parameters form 38
5 PAM test: acute effects on photosynthesis in algae 41
5.1 Subject 41
5.2 Area of application 41
5.3 Terms and definitions 41
5.4 Principle of the test 41
5.5 Reagents and additives 42
5.6 Equipment 42
5.7 PAM fluorometer 42
5.8 Internal standard 43
5.9 Method 43
5.9.1 Starting up equipment (beginning of test day) 43
5.9.2 Making the algal suspension 43
5.9.3 Sample pretreatment 44
5.9.4 Making the concentration series 44
5.9.5 Incubation 46
5.9.6 Measurements 46
5.9.7 Calculating EC10 and EC50 values 47
5.10 Parameters 47
5.11 Validity criteria 48
5.12 Statistical processing 48
5.13 Reference substance toxicity 48
5.14 Reporting 48
5.15 Quality assurance 48
5.16 Safety 49
5.17 References and additional information 49
6 Algae plate test to measure toxicity to Pseudokirchneriella subcapitata
(Korshikov) F. Hindák 53
6.1 Subject 53
6.2 Area of application 53
6.3 Terms and definitions 53
6.4 Principle of the test 53
6.5 Reagents and additives 53
6.6 Equipment 54
6.7 Making the test medium 54
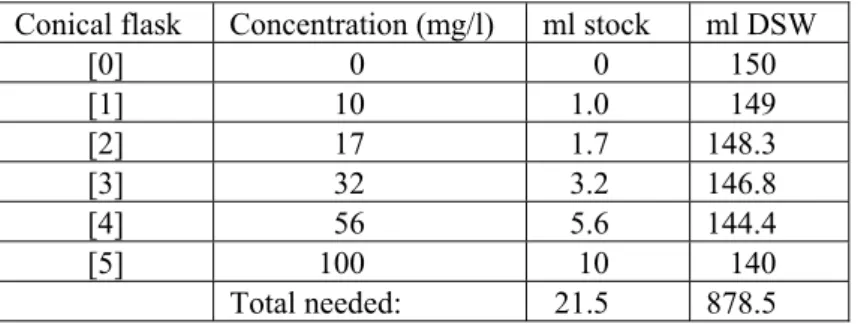
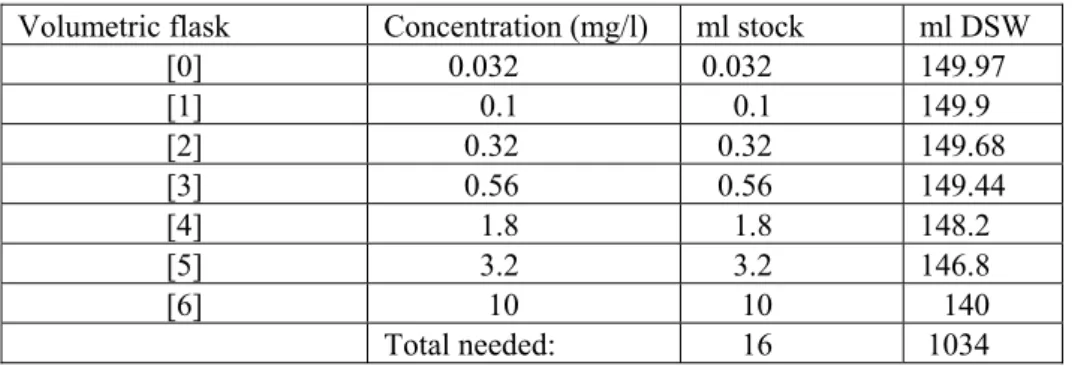
6.8 Diluting stock solutions 55
6.9 Concentrated test medium (10x) 56
6.10 Preparing preculture 56
6.11 Diluting preculture 56
6.12 Test solutions 56
6.13 Determining the algae concentration in the test plates 59
6.14 Incubation 59
6.15 Calculating cell concentration 59
6.16 Calculating EC50 values 59
6.17 Validity criteria 60
6.18 Reference substance toxicity 60
6.19 Reporting 60
7 Daphnia IQ toxicity test 61
7.1 Subject 61
7.2 Area of application 61
7.3 Terms and definitions 61
7.4 Principle of the test 61
7.5 Reagents and additives 62
7.6 Equipment 62
7.7 Reference substance 62
7.8 Method 62
7.8.1 Preparing the test organisms 62
7.8.2 Preparing for the test (environmental samples) 63
7.8.3 Test preparation (quality test) 64
7.8.4 Test implementation (quality test + environmental samples) 64
7.9 Parameters 64
7.10 Validity criteria 65
7.11 Statistical processing 65
7.12 Reference substance toxicity 65
7.13 Reporting 65
7.14 Quality assurance 65
7.15 Safety 66
7.16 Reference and additional information 66
7.17 Daphnia magna or pulex parameter form 67
7.18 Score list for acute toxicity test using water flea Daphnia 68
8 Toxicity test using Thamnocephalus platyurus (THAMNOTOXkit-F) 69
8.1 Subject 69
8.2 Area of application 69
8.3 Terms and definitions 69
8.4 Principle of the test 69
8.6 Equipment 70
8.7 Reference substance 70
8.8 Method 70
8.8.1 Preparing the test organisms 70
8.8.2 Preparing for the test (environmental samples) 71
8.8.3 Test preparation (quality test) 72
8.8.4 Test implementation (quality test + environmental samples) 72
8.9 Parameters 73
8.10 Validity criteria 73
8.11 Statistical processing 73
8.12 Reference substance toxicity 73
8.13 Reporting 74
8.14 Quality assurance 74
8.15 Safety 74
8.16 References 74
8.17 Thamnocephalus platyurus parameters form 75
8.18 Score list for acute toxicity test using crustacea Thamnocephalus platyurus 76
9 Toxicity test using Brachionus calyciflorus (ROTOXkit-F) 77
9.1 Subject 77
9.2 Area of application 77
9.3 Terms and definitions 77
9.4 Principle of the test 77
9.5 Reagents and additives 77
9.6 Equipment 78
9.7 Reference substance 78
9.8 Method 78
9.8.1 Preparing the test organisms 78
9.8.2 Preparing for the test (environmental samples) 78
9.8.3 Test preparation (quality test) 80
9.8.4 Test implementation (quality test + environmental samples) 80
9.9 Parameters 80
9.10 Validity criteria 81
9.11 Statistical processing 81
9.12 Reference substance toxicity 81
9.13 Reporting 81
9.14 Quality assurance 81
9.15 Safety 82
9.16 References 82
9.17 Brachionus calyciflorus parameter form 83
9.18 Score list for acute toxicity test using rotifer Brachionus calyciflorus 84
10 Chydotox toxicity test 85
10.1 Subject 85
10.2 Area of application 85
10.3 Terms and definitions 85
10.4 Principle of the test 85
10.5 Reagents and additives 86
10.6 Equipment 86
10.7 Reference substance 86
10.8.1 Preparing the test organisms 86
10.8.2 Preparing for the test (environmental samples) 87
10.8.3 Test preparation (quality test) 88
10.8.4 Test implementation (quality test + environmental samples) 88
10.9 Parameters 88
10.10 Validity criteria 89
10.11 Statistical processing 89
10.12 Reference substance toxicity 89
10.13 Reporting 89
10.14 Quality assurance 89
10.15 Safety 89
10.16 References 90
Summary
A previous RIVM/Centre for Water Management-report discussed the evaluation and validation of bioassays. In an annex, it was mentioned that the protocols, necessary to perform the bioassays in exactly the same way as RIVM and Centre for Water Management do, would be published later. In the current report, all the protocols are included.
1
Introduction
In RIVM-report 607013010, entitled ‘Toxicity measurements in concentrated water samples.
Evaluation and validation’, is referred to protocols for the execution of bioassays in appendix I at page 107 (RIVM, 2009). Publication of the protocols is useful to complete the extended documentation given in that report. However, not all users will be interested in the level of detail given in the
protocols. Therefore, this separate report containing the protocols is published only digitally, allowing any one who is interested to read how the bioassays are performed. In the next chapters, protocols will be given for sampling, sample treatment, and seven bioassays (the protocol for Daphnia immobility test was not found).
The intention is that the protocols are readable independently. For that reason, some information is repeated in many chapters, e.g. in footnotes. For the same reason, references are given on a per-chapter basis.
RIVM often applies the bioassays mentioned in this report in combination with the sampling and pretreatment procedures as described in chapter 2 and 3. However, the bioassays could be applied with other sampling or pretreatment procedures. Therefore, the description of the bioassays applies to all samples, no matter the pretreatment.
2
Sampling and preservation of surface water for use
in toxicity tests
Keywords: monitoring, surface water, sampling, preservation
2.1
Subject
This protocol describes the methods by which surface water samples should be taken for use in toxicity tests. It also describes the procedures for preserving the samples. The methods described apply to both manual and automated sampling (random samples in both cases). Surface water samples will generally undergo pretreatment before being used in toxicity tests. For a description of this procedure, see chapter 3, ‘Sample pretreatment for use in toxicity tests’.
2.2
Area of application
The protocol described here is primarily intended for sampling in surface water, though it can in principle be used for any water system.
2.3
Principle
Sampling and preservation are vital elements of toxicity tests on surface water samples or extracts thereof. Many factors can influence the toxicity of a sample, including homogeneity, stratification, contamination, adsorption, evaporation, photodegradation, biodegradation, physical-chemical transformations and hydrolysis. To minimise these negative impacts, samples must be taken and preserved in the correct way.
2.4
Terms and definitions
Random sample: sample taken at a random time at a random sampling point PE, PP, PC: polyethylene, polypropylene, polycarbonate
Stratification: layered structure
2.5
Reagents and additives
2.6
Equipment
2.6.1
Sampling (manual)
• Buckets (PE, PP or PC) with spout and cord (10 litres) • Funnel (plastic)
• Jug (1 litre, plastic)
• 25-litre sealable sampling vessels (stainless steel) • Writing materials
• Sampling form • Labels
• Personal protection equipment • Refrigerated storage (4 °C)
2.6.2
Sampling (automatic)
• Pumping system (peristaltic, centrifugal or submersible pump), minimum pumping speed 0.5 m/s • Pump hoses (silicon only for use with peristaltic pumps)
• Clamps
• Pulley extension cable 220 V • Water hoses
• Connectors
• Generator (220 V), if no electricity supply is present • 25-litre sealable sampling vessels (stainless steel) • Writing materials
• Sampling form • Labels
• Personal protection equipment • Refrigerated storage (4 °C)
2.7
Sampling method
Implementation (manual)
• Check you have all the material needed, including the correct number of (clean) sampling vessels. • Check the location details and sampling points. Take particular note of any possible currents and
stratification.
• Ensure a clean working environment at the sampling point, free of dust, exhaust fumes, solvents and fuels.
• Fill the bucket with the water for sampling by lowering it gently below the surface to a depth of approximately 10 to 15 cm.
• Ensure that the bucket does not scrape the side of the boat and/or bank as you raise it. • Rinse the funnel and jug using the sample.
• Rinse the sampling vessels at least twice using the sample.
• Fill the sampling vessels with the sampled water, regularly stirring the sample in the bucket to guarantee the homogeneity of the sample (suspended particulate matter).
• Ensure that the sampling vessels are filled to the brim, with no air bubbles above the liquid. • Seal the sampling vessels immediately.
• Ensure that the sample is fully and correctly coded. Note at least the following on the sampling vessel: type of sample, date and time of sampling, location details, client/sender, code (if desired). • Complete the sampling form in full.
• Preserve the samples according to instructions. Implementation (automatic)
• Check you have all the material needed, including the correct number of (clean) sampling vessels. • Check the location details and sampling points. Take particular note of any possible currents and
stratification.
• Ensure a clean working environment at the sampling point, free of dust, exhaust fumes, solvents and fuels.
• Submerge the suction point of the pump below the water surface to a depth of 50-100 cm, with the inlet towards the direction of flow. The pump must be at least 50 cm above the bed. When
sampling from a boat, the suction point must be at least 1.5 m from the hull, and far enough upstream to guarantee the free flow of surface water.
• Set the pump to the required flow rate (see section 6.2).
• Allow the system to flush through for 5-10 minutes before commencing sampling. • Ensure that no air bubbles enter the pump system.
• Prevent coarse particles from entering the sampling by fitting a filter (wide mesh) or gauze (plastic) in front of the suction point.
• Rinse the sampling vessels at least twice using the sample. • Fill the sampling vessels with the sampled water.
• Ensure that the sampling vessels are filled to the brim, with no air bubbles above the liquid. • Seal the sampling vessels immediately.
• Ensure that the sample is fully and correctly coded. Note at least the following on the sampling vessel: type of sample, date and time of sampling, location details, client/sender, code (if desired). • Complete the sampling form in full.
• Preserve the samples according to instructions.
2.8
Preservation of surface water samples
• After sampling the samples should be stored as soon as possible in a cool (4 °C) dark place. • Transport the samples to the test laboratory immediately (within 24 hours). Ensure that the samples
are kept in cool (4 °C) dark conditions during transportation.
• If the samples cannot be processed immediately (within 24 hours) at the test laboratory, they should be frozen (-20 °C).
• Small portions of no more than 1 litre should be frozen for use in toxicity tests. The portions should be divided into PE sample pots. The pots should be filled to no more than 80% of their total volume and sealed airtight. Before the pots are filled, they should be rinsed with the sample. Stir the sample regularly when distributing it among the pots to ensure it is homogeneous.
• If several sampling vessels have been used at each location (sampling point), their contents should first be mixed to form a single combined sample before it is divided among the sample pots. • If the surface water sample is to be used for sample conversion (XAD), at least 20% should be
removed from the 10-litre sampling vessel before it is placed in the freezer. If several vessels have been used at each location (sampling point), they need not be combined to form a single sample. This will take place after XAD extraction.
2.9
Reporting
Sampling should be reported on the specially designed form, which can be found in the section ‘Sampling form’ later in this chapter.
2.10
Quality assurance
Quality assurance focuses on the sampling procedures and the conduct of staff. The following factors are particularly important:
• flow patterns in the sampling area;
• possible stratification at the sampling point;
• homogeneity of the surface water at the sampling point; • use of correct, clean sampling material;
• accurate coding of the sampling vessels.
2.11
Safety
• Wear appropriate protective clothing during sampling (safety goggles and gloves). • Ensure that the sampling vessels are secured during transportation.
• Be aware of danger at sampling locations (slippery surfaces etc.).
2.12
Maintenance
The specific equipment used for automatic sampling does not require regular maintenance or calibration.
2.13
References and additional information
More information can be found in:RIZA/RIKZ (1996) GMP. Rijkswaterstaat voorschrift nr. 913.00.W001. Monsterneming van oppervlaktewater met behulp van emmer.
RIZA/RIKZ (1996). GMP. Rijkswaterstaat voorschrift nr. 913.00.W002. Monsterneming van oppervlaktewater met behulp van pompsysteem.
Maagd, G-J. (2000). Monstername en monstervoorbehandeling in Totaal-Effluentbeoordeling. RIZA, januari 2000.
ISO 5667-6 (1990). Water quality, Sampling, Part 6: Guidance on sampling of rivers and streams. ISO 5667-4 (1987). Water quality, Sampling, Part 4: Guidance on sampling from lakes, natural and
2.14
Sampling form
3
Sample pretreatment for use in toxicity tests
Keywords: XAD, extracts, concentrate, eluate, microcontaminants, monitoring, surface water
3.1
Subject
This protocol describes the methods by which surface water samples should be pretreated for use in toxicity tests. The conversion process consists of three elements, which eventually produce a
concentrated water sample for use in toxicity tests. The protocol is based on methods developed by the National Institute for Public Health and the Environment’s Ecotoxicology Laboratory (presently called Laboratory for Ecological Risk Assessessment) in Bilthoven.
3.2
Area of application
The protocol described here is primarily intended for surface water, though it can in principle be used for any water sample.
3.3
Terms and definitions
XAD: polymeric adsorbent resin (Amberlite) XAD-4: polystyrene divinyl benzene copolymer resin
XAD-8: polymethyl methacrylate resin
Solid phase extraction: extraction of liquids using a solid adsorbent Eluate: organic fraction collected after elution of XAD
Water concentrate: aqueous sample containing microcontaminants in concentrated form Concentration factor: value denoting the degree of concentration of the original sample
3.4
Principle of water sample conversion
The conversion of water samples begins with concentration using XAD resins. The sample is mixed with the XAD resins, isolating apolar substances and substances with weak polarity. The resins are then eluted using an organic solvent (acetone), and then converted to a concentrated sample. The sample is distilled so that what eventually remains is a highly concentrated aqueous sample which can be diluted for use in toxicity tests.
3.5
Reagents and additives
• Sodium hydroxide (4% v/v) • Perchloric acid (HClO4)• Methanol p.a. • Acetone p.a. • Milli-Q water
• XAD-4 resin (Rohm & Haas, Antwerp, Belgium)
• XAD-8 resin (Supelite DAX-8, Supelco, Alrich, Zwijndrecht, the Netherlands) • EPA medium (US EPA, 1985)
• Nitrogen
• Cyclohexane p.a. • Ethanol
3.6
Equipment
• Borosilicate glass bottles (e.g. 10-litre) with Teflon-lined stopper • Glass beakers
• Volumetric cylinders • Funnels
• Elution columns, Ø 1.05 cm, 30 cm long, glass with ground-glass joints at top and in bottom of glass filter
• Dosing pipette, glass with broad tip
• Sample vials (30 and 60 ml) with crimp cap (Chrompack, Bergen op Zoom, the Netherlands) • Sieve, 50 µm, stainless steel
• Deep freeze • Roller apparatus • Glass petri dishes • Analytical balance • Crimping pliers • Water bath
• Kuderna Dänish evaporation glassware (mini version) (receiving vessel64723 (2 ml), flask64729
(250 ml), condensor64839, Supelco, Aldrich, Zwijndrecht, the Netherlands)
• Thermometer (min. 100 °C) • Zeolites
• Aluminium foil • Digital flow meter • Soxhlet extractor
3.7
Pretreatment of XAD resins
Before the XAD resins can be used they must first be purified. First, they are washed in sodium hydroxide (repeat 10 x) and then with perchloric acid 4% (repeat 10 x). They are then washed with milli-Q (repeat 10 x) and then with methanol (repeat 2 x). The washing procedure is followed by Soxhlet extraction using methanol (24 hours) and washing in ethanol (repeat 3 x). The resins are then subjected to Soxhlet extraction once again, using a mix of ethanol and cyclohexane (30.5/69.5 V/V%). Finally, the resins are rinsed with methanol (repeat 5 x). They are then stored in methanol p.a. in the dark at room temperature until use.
Purified XAD resin (XAD-4 and XAD-8) can also be obtained from KWR, Nieuwegein, the Netherlands (formerly called KIWA Water Research).
3.8
Method
The method has been divided into three elements: XAD extraction, elution with acetone and the conversion of acetone extract to water concentrate.
3.8.1
XAD extraction
• Take 7.5 ml XAD-4 and 7.5 ml XAD-8 for every 60 litres of water sample.
• Pour the XAD into an elution column using a glass funnel, ensuring that the XAD remains under the methanol. Begin with the XAD-4.
• Rinse the XAD with 10 × bed volume water (= 90ml).
• Transfer the XAD into the water sample (60 litres) using water and a clean glass beaker. Measure out 2.5 to 3 ml XAD-4/8 for each 10-litre sample bottle.
• Place the bottle on a roller apparatus and mix the sample with the resin at room temperature in the dark for at least 48 hours (adsorption).
• After at least 48 hours, sieve the XAD through a 50 µm sieve. Dry the XAD by pressing tissues against the bottom of the sieve.
• Transfer the XAD to a petri dish (Ø 10cm) whose empty weight has been determined, spreading it over the entire surface of the petri dish as far as possible. Shake the petri dish a number of times during drying.
• Dry the XAD in a functioning fume cupboard for at least 24 hours.
• The XAD (15 to 18 ml on methanol base) is dry enough once it weighs <5.4 grammes.
3.8.2
XAD elution using acetone
• Rinse the column with acetone (p.a. quality) and dry with pressured air.
• Transfer the dry XAD to a clean elution column (L = 30 cm, Ø 1.05 cm). See Equipment. • Add enough acetone to ensure that all XAD is submerged.
• Remove any air bubbles by gently shaking the column a number of times.
• Elute using 25 ml acetone. Elute slowly to ensure that the process runs smoothly (approximately 30 minutes).
• Collect the eluate in a 60 ml sample vial. Note the volume on the sample form (section 3.15). • Seal the sample vial and store it in the deep freeze at -18 °C.
3.8.3
Conversion of acetone eluate to water concentrate (KD distillation)
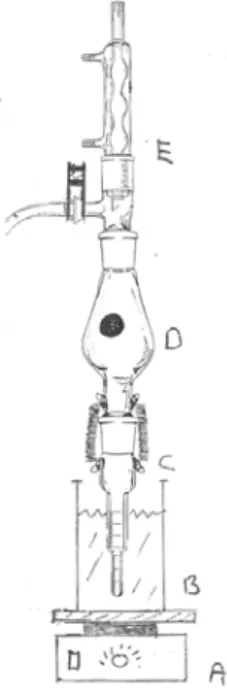
• Set up a Kuderna-Dänish (KD) concentrator apparatus in a fume cupboard. The receiving vessel should be suspended in the water bath. The flask is coupled to this, and connected to the condenser (see Figure 1).
• Heat the water bath to 65-70 °C and switch on the cooling water. • Quantitatively transfer the acetone eluate to the KD apparatus. • Add a zeolite and 0.7 ml milli-Q.
• Commence distillation by placing the apparatus in the water bath. Wrap the flask in aluminium foil.
• Cease distillation as soon as the residue stops boiling, approximately. 0.2 ml (ensure distillation does not continue for too long).
• Remove and seal receiving vessel immediately. Note the colour of the residue on the sample form (section 3.15).
• Quantitatively transfer the residue, using EPA-medium to a 60 ml sample vial and fill it to 60 grammes.
• Note data on sample form (section 3.15).
Figure 1. KD apparatus: a) heating plate, b) water bath, c) receiving vessel, d) KD flask, e) condenser.
3.9
Calculating concentration factor
The concentration factor for a sample is calculated as follows:
volume e concentrat water volume sample original factor ion concentrat =
The volumes should be expressed in the same unit.
The concentration factor in the procedure described is 1000.
3.10
Reporting
The results of the conversion procedures should be reported using the specially designed form which can be found in section 3.15 of this chapter.
3.11
Quality assurance
To guarantee the quality of the conversion technique, the recovery and reproducibility of the technique must be known. Recovery with standard deviation is given below for two types of substances
(Collombon et al., 1997):
XAD concentration (1997 method, elute 3 times with acetone)
• 2,4 dichloraniline (in mixture of 12 narcoticising substances): 108 ± 7% recovery (n=6) • diuron (in mixture of 6 pesticides): 99 ± 6% recovery (n=6)
Water concentrate (1997 method, without N2 purging)
• 2,4 dichloraniline (in mixture of 12 narcoticising substances): 61 ± 7% recovery (n=3) • diuron (in mixture of 6 pesticides): 55 ± 3% recovery (n=3)
3.12
Safety
• Always wear suitable protective clothing (lab coat, safety goggles and gloves) when performing the tests.
• Regard the contaminated samples as chemical waste and dispose of accordingly. • Work in a fume cupboard, as organic solvents are used in this procedure. • Read the toxicity data and safety instructions for the solvents before use.
3.13
Maintenance
The specific equipment used for the conversion of water samples does not require regular maintenance or calibration.
3.14
References and additional information
M.Collombom, R. van de Kamp, J. Struijs (1997). Procedures for extracting organic micro-pollutants from water samples to monitor toxicological stress. RIVM rapport nr. 607042008.
U.S. EPA, (1985). Methods for measuring the acute toxicity of effluents to freshwater and marine organisms. EPA 600/4-85-013 Envirn. Research Laboratory, Duluth.
More information can be found in:
RIVM (1999) Document ECO/303/01. Rijksinstituut voor Volksgezondheid en Milieu, Laboratorium voor Ecotoxicologie, februari 1999. (In Dutch.)
Beveren, J. van (1989) Voorschrift voor de XAD isolatie in watermonsters van 50 tot 300 liter, deel 2: de opwerking; KIWA Nieuwegein, juni 1989. (In Dutch)
Penders, E.J.M., Hoogeboezem, W. (2000) Biotesten, een bruikbaar instrument voor de kwaliteitsbewaking van oppervlaktewater. RIWA. (In Dutch)
3.15
Sample form for sample pretreatment
Data Sample code Sample volume (l) Distillation residue colour Water concentrate volume (ml) Storage Remarks4
Toxicity test using luminescent bacteria
Keywords: bacterium Vibrio fischeri, quality test, monitoring, surface water, bioluminescence
4.1
Subject
This protocol describes a toxicity test in which the bioluminescent bacterium Vibrio fischeri (formerly Photobacterium phosphoreum) is exposed to a sample for analysis. The method is derived from ISO 11348-3 (1998) and the NVN 6516 (1993) standard. The reduction in bioluminescence in Vibrio fischeri is measured after 5, 15 and 30 minutes. The inhibition of light emission correlates with the degree of toxicity. The protocol also includes a description of a quality test for determining the sensitivity of batches of bacteria. Phenol is used as the reference substance in the quality test.
4.2
Area of application
The protocol described here has been drawn up for tests on surface water and extracts of surface water. Since Vibrio fischeri are used, the protocol is applicable to both freshwater and saltwater samples.
4.3
Terms and definitions
Bioluminescence: light emission by bacteria under the influence of metabolic reactions Lyophilised: freeze-dried in a vacuum
EC20/EC50: the toxicity of a sample expressed as the concentration at which 20% or 50%
reduction in luminescence occurs relative to the blank
Reference toxicant: a substance (phenol in this case) used to establish the sensitivity of a batch of bacteria
4.4
Principle of the test
Vibrio fischeri is a luminescent bacterium, which has the property of emitting part of the energy released in the metabolic reaction (ascorbic acid cycle) as light. Any disruption in this metabolic reaction as a result of the presence of toxic substances will result in a change in the amount of light emitted. This reduction can be quantitatively determined using a luminescence meter (Microtox™ or LUMIStox™). The toxicity of a sample is expressed as the concentration at which a 20% or 50% reduction in luminescence occurs relative to the blank (EC20 or EC50).
4.5
Reagents and additives
General• Test kits/reagents for measuring ammonium and nitrite (e.g. cuvette test developed by Dr. Lange, Tiel or test strips from Merck, Amsterdam)
• Ultrapure water (e.g. Millipore, Etten-Leur or Salm & Kipp, Breukelen) • Phenol (p.a.)
Microtox™
• Microtox™ reconstitution solution (shelf life: see packaging), Azur Environmental Ltd., Berkshire, UK
• Microtox™ diluent (sodium chloride solution, shelf life: see packaging) • Microtox™ reagent (lyophilised Vibrio fischeri, shelf life: see packaging) • MOAS (saline solution, shelf life: see packaging)
LUMIStox™
• LUMIStox™ luminescent bacteria (freeze-dried Vibrio fischeri, shelf life: at least 9 months at -18 °C), Dr. Lange, Tiel.
• Reactivation solution (sodium chloride, potassium chloride, magnesium chloride solution) • NaCl (solid)
• Saline solution (2% NaCl)
4.6
Equipment
General • pH meter • Oxygen meter • Conductivity meter • Balance • Table centrifuge • Repeating pipette (10 – 500 µl) • Automatic pipettes (1 and 5 ml) • Volumetric flasks and cylinders • Stopwatch/clock• Calibration thermometer (max. deviation 0.2 ºC) Microtox™
• Microtox™ analyzer (M500) connected to a PC with MicrotoxOmni software version 1.15 for Windows
• Microtox™ cuvettes (glass)
• Spectrophotometer (wavelength 490 nm) • Cuvettes (1 cm)
LUMIStox™
• LUMIStox™ 300 connected to a PC (LUMISsoft™ III software for Windows) with LFD 2000 printer
• LUMIStherm™ (15.0 ± 0.2 °C) • LUMIStox™ cuvettes (glass) • Test tube (15 ml)
4.7
Reference substance
Phenol (p.a.) is used as the reference substance for the quality test, measured from a stock solution of 40 mg/l, which must be made fresh prior to each quality test.
4.8
Preparing for the test
4.8.1
Preparing for the test (environmental samples)
Surface water/concentrate
• The sample should be free of particles, as they can disrupt the light signal during the test. It should preferably be tested with as little pretreatment as possible. Any particles should be removed initially by means of settling and decanting, thereafter by centrifugation, repeated if necessary1.
Extracts of surface water
• If extracts are used in a solvent whose toxicity is unknown, its toxicity to Vibrio fischeri must first be established. To this end, a test is performed with the solvent. Before testing, the solvent is diluted five times, to produce the following series of concentrations: 10 – 5 – 2.5 – 1.25 vol%. The results of the test allow a sample dilution to be determined. The sample should be diluted in such a way that the solvent causes less than 10% luminescence inhibition in the bacteria (see
section 4.13).
• Given the possible effects of physical and chemical parameters, measure the pH, oxygen content, conductivity, and the nitrite and ammonium contents of the sample2 (surface water or extract).
o pH (using a pH meter);
o oxygen content (using an oxygen electrode); o nitrite content (using a test kit);
o ammonium content (using a test kit); o conductivity (using a conductivity meter).
4.8.2
Preparing for the test (quality test)
Prepare a stock solution by dissolving 0.2 g of phenol in 50 ml milli-Q. Dilute the solution 100 times to produce the stock solution of 40 mg/l (initial test concentration 18 mg/l).
4.9
Microtox™ method
In the description below the methods for testing environmental samples and the quality test using phenol have been combined.
4.9.1
Preparing the test organisms
• Switch on the Microtox™ equipment at least half an hour before use.
• Place 1 ml of reconstitution solution in a cuvette and place it in the appropriate reagent well. • Once the reconstitution solution has reached the correct temperature in the incubator block, the
bacteria can be reconstituted. Add 1 ml of the reconstitution solution (from the reagent well) to a
1 If the sample is still turbid, it can be filtered over glass fibre or eventually over a 0.45 µm filter. 2 Assuming sufficient sample volume is available.
pot of freeze-dried bacteria. Gently shake the pot to produce a homogeneous suspension, and transfer this to the cuvette which held the reconstitution solution.
• Place the cuvette with the bacterial suspension in the incubator block and mix it by sucking up 10 × 500 µl with a 1 ml pipette and expelling it back into the cuvette.
• The bacterial suspension is now ready and can be used for the next 4 hours. If the suspension is kept for longer than 4 hours a quality test must be performed simultaneously with the test to check the quality of the bacteria.
4.9.2
Equipment settings
• Turn on the PC and start up Windows (menu controlled by mouse) with password. • Click on ‘Run test’
• Choose the ‘Basic test’ protocol from the list, NEXT>
• Check the settings in the ‘Test parameters’ screen. The following standard settings should be shown for the standard test:
Test protocol Basic Test or Quality Test Test description Description of sample
Test toxicant Surface water, Extract, Solvent or Phenol Number of controls 1
Control replicates 2 Number of samples 1 or 2 Sample replicates 2 Number of dilutions 4
Initial concentration 45 (freshwater sample), 50 (saltwater sample), 10 (solvent) or 18 (quality test)
Dilution Factor 2
Concentration Units % or mg/l
Test times 5, 15 and 30 minutes
Time units minutes
• If desired, note the fact that a solvent control is also being performed, which concentration of solvent is being used, and the number of replicas.
• Click on ‘Additional data’ and enter the batch number stated on the pot in which the freeze-dried bacteria are stored. NEXT>
• Enter the sample number or name as ‘sample name’.
• Follow the ‘Wizard’, which will guide you through the test (see section 4.9.3)
4.9.3
Test implementation
• Place the test cuvettes in the Microtox incubator block..
• Add 1500 µl of diluent to row A of cuvettes 1 to 4. Add 250 µl MOAS to cuvette 5 row A (do not add MOAS if conductivity > 2564 µS/mm).
• Add 500 µl of diluent to rows B and C of cuvettes 1 to 5. Add 500 µl to a further two cuvettes and place them temporarily in another part of the incubator block.
• Add 10 µl of bacterial suspension to cuvettes B1 to 5, C 1 to 5 and the two extra cuvettes, using an Eppendorf repeating pipette (homogenise the bacterial suspension before use).
• Carefully mix the cuvettes (gently shake by hand).
• The cuvettes must then stand (in the incubator block) for 15 to 20 minutes before the test can commence.
from A5 to A4, from A4 to A3 and from A3 to A2. Mix well each time solution is transferred. No sample is added to A1 (= blank).
• Before commencing the test, check the initial values.
For this purpose, the tubes are measured once, 15 minutes after the bacterial suspension has been added. Place the first cuvette in the READ chamber. Before measuring a series of cuvettes, press the SET button (when measuring the first sample). Then set the initial value using the READ button on the Microtox™. Check the value of all cuvettes, which must differ by no more than 15 units. Should some differ by more than 15 units, check whether the two extra cuvettes fall within the range, and if necessary exchange them for cuvettes that do not. If there is still too large a range, the test will be invalid, and new cuvettes containing diluent and bacterial suspension will have to be placed in rows B and C, after which the initial values will have to be checked again. If the initial values are correct, wait 5 minutes before taking the actual measurements.
• Place cuvette B1 in the READ chamber. Press the SET button on the Microtox™ (reset).
• After the cuvette has been measured, press the space bar and then the READ button. The value will appear on the computer screen and on the Microtox™ display. Then measure the initial values of all cuvettes in the following order: C1, B2, C2, B3 … etc.
• Immediately after taking the reading from C5 pipette 500 µl of the dilution series to rows B and C as follows: 500 µl from A1 to B1, from A1 to C1, from A2 to B2, from A2 to C2 etc. After each dilution in rows B and C mix the A row by sucking up and expelling the dilution three times. • Immediately after mixing in cuvette C5, press the space bar. The test duration will appear on the
screen.
• After 5 minutes the computer will indicate that the cuvettes need to be measured. Begin with cuvette B1. At fixed times (15 and 30 minutes) the screen will indicate that the flashing cuvette needs to be measured. The order of measuring is B1, C1, B2, C2, B3, C3, B4, C4, B5 and C5. • After the final measurement, enter the desired file name for the results.
• After the final measurement, set the calculation options by choosing: ‘OPTIONS’ ? ‘CALCULATION OPTIONS’ set EC value (20 or 50).
• Print a report by choosing: ‘DATA’ ? ‘GENERATE REPORT FROM CURRENT DATA’ ? ‘PRINT’.
4.10
Microtox™ colour correction
Perform a colour correction if the liquid in the cuvette is clearly discoloured in the concentration where EC20 or EC50 occurs (visual observation).
• Prepare the solutions of the sample which will be used to calculate the EC20 or EC50 value.
• Set the spectrophotometer to wavelength 490 nm.
• Zero the spectrophotometer with diluent and measure the transmission (%) of all desired concentrations (1 cm cuvette, glass or quartz).
• Enter the values measured in the MicrotoxOmni worksheet by going to the ‘TEST’ menu and choosing ‘ENTER COLOUR CORRECTION DATA’. An extra column (ABSx) will appear, in which the spectrophotometer results can be entered.
4.11
LUMIStox™ method
A brief description of the LUMIStox™ method is given below. If a reference substance (e.g. phenol) is used, this can be regarded as a sample, and the settings of the LUMIStox™ adjusted accordingly.
4.11.1
Preparing the test organisms
• If necessary, defrost the reactivation solution to 4 °C (in refrigerator). • Pipette 12 ml of reactivation solution into the test tube.
• Shake vigorously and place the solution in the refrigerator (3-6 °C) to bring it to temperature. • Pipette 0.5 ml of reactivation solution from the test tube into a tube of freeze-dried bacteria. • Place the bacterial suspension in the refrigerator (3-6 °C) for 15 minutes, and the remaining
reactivation solution in the LUMIStherm at 15 °C.
• The bacterial suspension is now ready and can be used for the next four hours. If the suspension is kept for longer than 4 hours a quality test must be performed simultaneously with the test to check the quality of the bacteria.
4.11.2
Equipment settings
• Start up the LUMISstox 300.
• Select measuring method ‘EC’ and test ‘492’.
• Change the settings. The following standard settings should be shown for the standard test: Number of dilutions: 3 to 9
Preliminary dilution: 2, 4, 8, etc Dilution type: DIN or geometric Unit sample component: % or mg/l
Conc. sample comp.: if unknown, enter 100% Incubation period: 5, 15 and 30
4.11.3
Test implementation (DIN with 9 dilutions)
• Place the test cuvettes in the LUMIStherm.
• Pipette the bacterial suspension (0.5 ml) into the remaining reactivation solution in the test tube and mix thoroughly.
• Pipette 0.5 ml of this solution into cuvettes B1 to B10 and C1 to C10 in the LUMIStherm. • The cuvettes must then stand in the incubator block for 15 minutes at 15 °C before the test can
commence.
• Add to the sample 2% of solid NaCl by, for example, dissolving 0.3 grammes of NaCl in 15 ml of sample (do not add salt if the salinity of the sample >20‰).
• Now prepare the dilution series. Add 1.5 ml of saline solution to test cuvettes A1 to A8, and 1 ml to A9. Add 1.5 ml of sample to cuvettes A8 and A10, and 2 ml to A9. Mix thoroughly using a cuvette. Make a 1:1 dilution by transferring 1.5 ml of test solution from A9 to A7, from A7 to A5 and from A5 to A3. Then make a second dilution series by transferring 1.5 ml from A8 to A6, from A6 to A4 and from A4 to A2. Mix well each time solution is transferred. No sample is added to A1 (= blank).
• I0 measurement: place cuvette B1 in the measuring cell of the LUMIStox and measure it. Remove the cuvette from the LUMIStox and return it to B1 in the LUMIStherm. Pipette 0.5 ml from cuvette A1 to B1 (= test start time). Place cuvette C1 in the measuring cell and measure it. Return the cuvette to C1 and pipette 0.5 ml from cuvette A1 to C1. Repeat with all cuvettes from rows B and C by pipetting from the cuvette in row A with the same number.
• After the incubation periods measure all cuvettes from rows B and C in the following order: B1, C1, B2, C2 … C10.
• After the final cuvette has been measured the EC20, EC50 and all measured values will be printed
4.12
Parameters
Parameters have been drawn up for the testing of environmental samples (Postma et al., 2002). All parameter criteria relate to the values in the actual test concentrations, except for the pH (original sample) The following parameters apply to Vibrio fischeri:
• pH: 6-8.5;
• oxygen content: > 30% of saturation value; • temperature: 15 ± 2 °C;
• ammonium content: < 1000 mg/l (at pH=8.0, 15 °C, 32‰); • nitrite content: < 70 mg/l;
• conductivity: 25640-46000 µS/cm.
4.13
Validity criteria
The following validity criteria3 apply to the toxicity test using the Vibrio fischeri bacterium:
• the loss of bioluminescence in the blank must be between 0.6 and 1.8;
• the solvent used should cause less than 10% luminescence inhibition relative to the blank; • the quality test must be valid.
4.14
Statistical processing
In the Microtox™ test an EC20 or EC50 (Effective Concentration) value is determined using the
MicrotoxOmni software (version 1.15). The LUMNIStox™ uses LUMISsoft III software. The EC20 or
EC50 value is defined as the concentration of test medium at which a 20% or 50% loss of
bioluminescence can be observed relative to the blank (= dilution medium) after a certain exposure time. The lowest of the EC20 or EC50 values determined at three points in time is used to indicate the
toxicity of the sample. The effects in the test are determined by linear regression analysis of the dose-effect relationship. To obtain a linear correlation between test concentration and dose-effect, the loss of bioluminescence at each exposure concentration is expressed as a gamma value (γ):
γ = (I0/It)-1
where:
γ = gamma value;
I0 = bioluminescence of blank;
It = bioluminescence of a sample after exposure time t.
The concentration-effect relationship for the exposure time is calculated using linear regression analysis: ln C = b[ln γ] + a where: γ = gamma value C = concentration
3 According to ISO standards, duplicate measurements should not deviate more than 3% from the average value. This is often
b = slope a = intercept
4.15
Reference substance toxicity
After a quality test has been performed, it will be necessary to check whether all the validity criteria of the test have been fulfilled (see section 4.13). Then, the EC20 will have to be determined on the basis of
the results and this value entered in the Shewart chart for this quality test. If the EC20 does not fall
within the range defined, the batch of bacteria must be rejected. The quality test should be carried out once every three months, and at any rate for each batch of bacteria. The EC20 value must comply with
the following limits for phenol4: EC
20, 5 min: 3.0 – 10.0 mg/l.
4.16
Reporting
The report of the test will need to include at least the following: • pretreatment of sample;
• sample data;
• sample parameter measurements;
• calculated toxicity data for the sample (EC20 and/or EC50);
• calculated toxicity data for the reference substance (EC20, 5 min).
4.17
Quality assurance
The methods drawn up by the RIKZ and laid down in standard instruction no. i013.90 (Validation of analysis methods and control/evaluation of performance characteristics) and i020.90 (Drawing up analysis characteristics) are used to calculate the (preliminary) quality criteria. The following criteria are important:
Repeatability: unknown Reproducibility: 29%
Rounding interval 1 decimal place (mg/l)
4.18
Safety
• Always wear suitable protective clothing (lab coat and gloves) when performing the tests. • Regard the contaminated samples as chemical waste and dispose of accordingly.
• Handle the reference toxicant with due care. Read the toxicity data and safety instructions before use.
4 Besides phenol, other substances can be used: 3,5-dichlorophenol, zinc sulfate heptahydrate and potassium dichromate.
4.19
Maintenance
The temperature of the incubator block of the Microtox analyzer (M500) or the LUMIStherm must be checked once a year using a calibrated thermometer. Once every two years the analyzer must be serviced by the supplier.
4.20
References and additional information
ISO 11348-3 (1998) Water quality- Determination of inhibitory effect of water samples on the light emission of Vibrio fischeri, Part 3 method with freeze dried bacteria.
NVN 6516 (1993). Water - Bepaling van de acute toxiciteit met behulp van Photobacterium phosphoreum. Nederlands Normalisatie Instituut, Delft, August 1993.
Postma JF, de Valk S., Dubbeldam M., Maas. J.L., Tonkes, M., Schipper CA, Kater B.J. (2002). Confounding factors in bioassays with freshwater and marine organisms. Ecotox. Environ. Saf. 53: 226-237.
More information can be found in:
Dr. Lange (1999). Luminescent bacteria test DIN 38412 L34, L341, NEN 6516 and AFNOR T90-320. Luminescent bacteria test LCK 492.
4.21
Vibrio fischeri sample data and parameters form
Project: : Sample : Storage conditions :
Date of receipt :
Concentration series : 1)………… 2)………… 3)………. 4)………… 5)………….. controls)……….. Sample type : surface water; extract; solvent; reference substance; other:
Sample frozen? yes/no Extract dilution : Date of test :
_______________________________________________________________________________________________________________________________
O2 adjustment yes, always to approximately 100% (sample with high O2 consumption)
Sample Treatment5 Test organism O 2 (%) pH Temp. (ºC) Conductivity (µS/mm) NO2- (mg/l) NH4+ + NH3 (mg/l) (ºC,pH,sal)6 No tre at me nt Set tle, dec ant Ce ntri fug e Fib re-gla ss filt erl Filt er 0.4 5 µm Ae rat e adj ust pH Vibrio fischeri >30 6 – 8.5 - 2564-46007 <70 <1000 (15, 8, 32)
Time Conc. before after8 before after remarks
5 Surface water and effluent/influent should preferably be tested in an untreated condition. If it contains too many particles, allow them to settle and decant the sample. Then use a centrifuge and/or filtration through fibre-glass filter and, finally, through a filtration filter.
5
PAM test: acute effects on photosynthesis in algae
Keywords: green alga, Pseudokirchneriella subcapitata (Korshikov) F. Hindák, monitoring, photosynthesis, surface water
5.1
Subject
The University of Amsterdam’s Department of Aquatic Ecology and Ecotoxicology has developed an alternative algae test in collaboration with the National Institute for Public Health and the Environment and Wageningen University’s Laboratory for Plant Physiology. In this test, the green alga
Pseudokirchneriella subcapitata (Korshikov) F. Hindák is exposed to a concentration series of a sample for 4.5 hours. The inhibition (EC50) of photosynthetic efficiency is then determined using a
pulse-amplitude modulation (PAM) fluorometer.
5.2
Area of application
The protocol described here has been drawn up for tests on surface water and extracts of surface water. Since the green alga Pseudokirchneriella subcapitata (Korshikov) F. Hindák (formerly Raphidocelis subcapitata and Selenastrum capricornutum) is used, the protocol is applicable only to freshwater samples.
5.3
Terms and definitions
EC50: The toxicity of a sample expressed as the concentration at which 50% inhibition of
photosynthetic efficiency occurs.
Internal standard: A toxic substance (atrazine in this case) which is used to establish the sensitivity of the test system.
5.4
Principle of the test
The green alga Pseudokirchneriella subcapitata (Korshikov) F. Hindák is exposed to a concentration series of the sample for 4.5 hours. The inhibition of photosynthetic efficiency is then measured using a PAM fluorometer connected to an autosampler and a computer. The determination of photosynthetic activity is based on the following principle. Light energy is absorbed by antenna pigments and
transmitted to the alga’s photosystems I and II. The energy is then transformed into photoproducts and heat. Light is also emitted (fluorescence). Blocking of the photosynthesis system by toxicants, for example, results in changes to the level of fluorescence. The fluorescence signal generally increases as the photochemical and/or heat production reduces. The PAM fluorometer records changes in the fluorescence signal as a saturating light pulse is applied. Photosynthetic efficiency can be derived from the signal recorded. The effects of the toxicant on photosynthetic efficiency are then quantified (EC50).
5.5
Reagents and additives
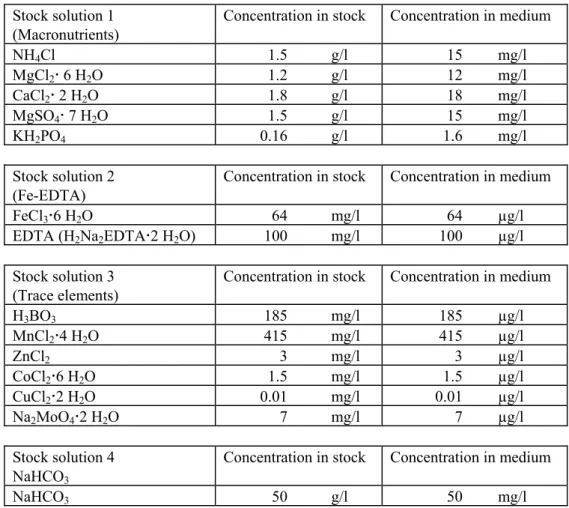
• Pseudokirchneriella subcapitata (Korshikov) F. Hindák green alga suspension • Dilution water (Dutch Standard Water, consisting of 1.36 mM CaCl2x2 H2O 0.50 mM
MgSO4x7 H2O; 1.14 mM NaHCO3; 0.20 mM KHCO3, pH = 8.2 ± 0.2)
• Test kits/reagents for measuring ammonium and nitrite (e.g. cuvette test developed by Dr. Lange, Tiel or test strips from Merck, Amsterdam)
• Ultrapure water or demi-water (e.g. Millipore, Etten-Leur or Salm & Kipp, Breukelen) • Internal standard (atrazine p.a., Riedel-de Haën, 0.1311 mM dissolved in 98% ethanol) • Ethanol
5.6
Equipment
• Test vials: glass, 3 ml
• Incubator (continuous light: 100 µE m-2s-1, 650 nm and continuous agitation: 100 rpm, Infors AG)
• Fluorometer (Walz; measuring head WATER-PAM/F) connected to an autosampler, both controlled by a PC with WinControl v.1.01.04, Excel and Graphpad software
• Rinsing vial • Parafilm
• Chrompack decapper
• Light meter (LI-COR, Lincoln, Nebraska, USA, LI-1000) connected to a test vial • pH-meter
• Conductivity meter
• Glass beakers (250 and 1000 ml) • Volumetric flask (200 ml)
• Automatic pipettes (100, 1000 and 5000 µl) • Repeating pipettes (25 and 50 ml)
• Cover plate
• Magnetic stirrer + flea • Waste receptacle
5.7
PAM fluorometer
A fluorometer is used to measure fluorescence signals. The PAM fluorometer differs from other fluorometers in terms of its measuring principle, which uses pulsed excitation light. Short weak light pulses (pulse length 3 µsec, 650 nm) from a LED (light emitting diode) are conducted to the algal suspension via a glass fibre (‘measuring light’). These light pulses induce a fluorescence signal. Given the brief half-life of fluorescence (nsec.) the induced fluorescence pulses will coincide with the excitation light pulses. Chlorophyll-a fluorescence has a wavelength between 660 and 760 nm. The fluorescence pulses are conducted to a detector via a glass fibre.
Filtering the measuring light with a short pass filter (which allows wavelengths < 695 nm through) and shielding the detector with a long pass filter (which allows wavelengths > 700 nm through) prevents the pulsed measuring light from reaching the detector. Only the pulsed fluorescence signal is then
amplified by a photomultiplier. The selective pulse amplification allows a fluorescence signal to be measured in unfiltered base lighting.
5.8
Internal standard
To verify the sensitivity of the test system, during each test the inhibition of photosynthetic efficiency in an algal suspension is determined using a standard concentration of 0.437 µM of atrazine
(herbicide). To this end, 30 µl 0.1311 mM atrazine in 98% ethanol is added to two vials of an identical composition to the controls.
5.9
Method
The method for testing extracts of surface water (XAD) is described below.
5.9.1
Starting up equipment (beginning of test day)
• Switch off the fluorescent lighting in the lab. • Switch on the incubation table’s transformer.
• Place an incubator block on the incubator and set the light intensity of the incubator’s reference position to 72 ± 1 µE m-2s-1 using the test vial connected to the light meter.
• Switch on the robot (on the back) and transformer in the measuring array. NB: first switch on the robot, then the computer!!
• Switch on the computer and start up WinControl.
• Activate batch-file AAN.TXT (FILE, EXECUTE BATCH FILE, OPEN BATCH FILE, AAN, OK).
• Place an incubator block on the measuring array and set the light intensity to 72 ± 1 µE m-2s-1 using
the test vial connected to the light meter (test array reference position).
5.9.2
Making the algal suspension
The test is performed using the green alga Pseudokirchneriella subcapitata (Korshikov) F. Hindák from continuous culture. The alga must be in the exponential phase. For information on the algal culture, the medium used, maintaining the continuous culture etc., see the University of Amsterdam’s PAM test guidelines (Beusekom et al., 1999).
• Enter the date and other details on the test form (section 5.19). • Fill a glass beaker (800 ml) with DSW.
• Calculate the amount of algal culture needed.
The formula below is used to calculate the amount of algal culture needed for 200 ml of algal suspension, which is enough to perform seven tests.
200 (cells/ml) culture of ion concentrat 10 0.3 algae of ml of number 7 × × =
• Note the number of ml of algal culture needed on the test form.
• Pipette the calculated amount into a 200 ml volumetric flask and make up to 200 ml with DSW. • Pour the contents of the volumetric flask into a glass beaker (250 ml), add a flea (bar magnet) and
place the beaker on the magnetic stirrer. • Start up the magnetic stirrer (100 rpm).
5.9.3
Sample pretreatment
Surface water/concentrate
The sample should be free of particles (XAD concentrate generally contains no particles). It should preferably be tested with as little pretreatment as possible. Any particles should be removed initially by means of settling and decanting, thereafter by centrifugation, repeated if necessary.
Extracts of surface water
If extracts are used in an unknown solvent, its toxicity to the alga must first be established. To this end, a test is performed with the solvent. Before testing, the solvent is diluted ten times and then 1:1, to produce the following series of concentrations: 10 – 5 – 2.5 – 1.25 vol%. The results of the test allow a sample dilution to be determined. The sample should be diluted in such a way that the solvent causes less than 10% fluorescence inhibition in the alga relative to the blank (see section 5.11).
Given the possible effects of physical and chemical parameters, measure the pH, oxygen content, conductivity, and the nitrite and ammonium contents of the control (DSW) and the highest concentration. If the parameter criteria are exceeded in the highest concentration, measure the parameters in the other dilutions9.
• pH (using a pH meter);
• nitrite content (using a test kit); • ammonium content (using a test kit); • conductivity (using a conductivity meter).
5.9.4
Making the concentration series
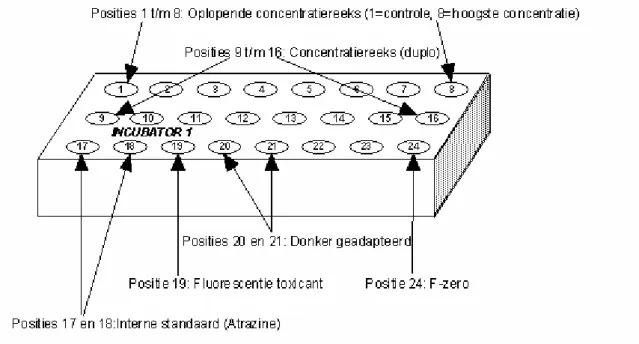
The concentration series should be produced in duplicate. The description is based on a standard concentration series for XAD concentrates with nominal concentration factors (C.F.) of 500×, 150×, 50×, 15×, 5×, 1.5×, 0.5× and 0× (=control), with DSW as the dilution medium. The concentration series may be adjusted if necessary (due to a shortage of concentrate, testing of other toxicants). As well as a double concentration series (Figure 2: positions 1 to 16), the entire sample series includes a number of extra samples. These extra samples can be used for setting the fluorometer, correcting the test results, checking the condition of the algae and verifying the implementation of the test.
Internal standard (atrazine; 0.437 µM) (positions 17 and 18)
To verify the sensitivity of the test system, during each test the inhibition of photosynthetic efficiency in an algal suspension is determined using a standard concentration of 0.437 µM of atrazine
(herbicide). To this end, 30 µl 0.1311 mM atrazine in 98% ethanol is added to two vials of identical composition as the controls.
Fluorescence of the sample (position 19)
The measured fluorescence signals must be corrected for the fluorescent properties of the sample. For this purpose, put the same volume as used for the highest test concentration into one vial. Treat in the same way as the highest testconcentration but add 1 ml of DSW instead of 1 ml of algae.
Photosynthetic efficiency after adaptation to the dark (positions 20 and 21)
These two vials have exactly the same composition as the controls. During the 4.5 hours of incubation these vials are exposed to light. After transfer to the measuring array they receive no light for
approximately 20 minutes. Then, after the algae have adapted to the dark, their optimum photosynthetic efficiency is determined.
F-zero (position 24)
To correct for background fluorescence and the fluorescence of DSW, before measurement commences the signal measured by the fluorometer must be set to zero. 3 ml of DSW is pipetted into this vial. F-zero is set just once a day, and therefore need only be placed in the first incubator block.
Figure 2. Layout of the incubator block. Positions 1 to 8: Increasing concentration series (1=control, 8=highest concentration). Positions 9 to 16: Concentration series (in dupl.). Positions 17 and 18: Internal standard (atrazine). Position 19: Toxicant fluorescence. Positions 20 and 21: Dark-adapted. Position 24: F-zero
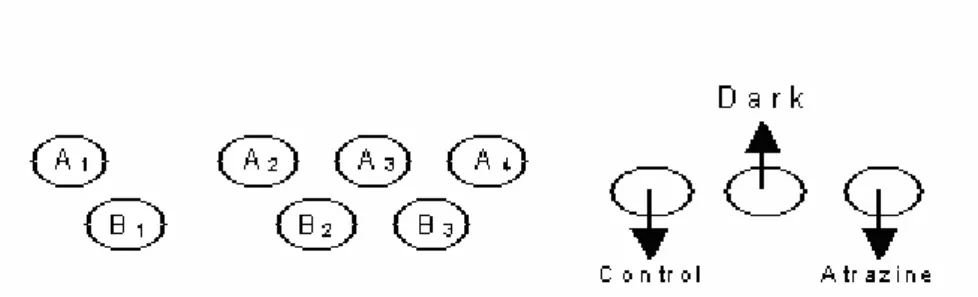
A description of the production of a single concentration series is given below. • Place 10 vials on the lab table (20 for double series) as shown in Figure 3.
• Add 2 ml DSW to all vials except A1 and B1 (repeating pipette; 50 ml tip, setting 2).
• Add 555 µl DSW to vial A1 (1000 µl pipette).
• Add 1722 µl DSW to vial B1.
• Note details of concentrate (test form, appendix 2).
• Shake and open the Chrompack vial containing XAD concentrate (using Chrompack decapper). • Add 1667 µl XAD concentrate to vial A1.
• Add 500 µl XAD concentrate to vial B1.
• Set the pipette to 222 µl and mix the content of vial A1 by sucking up the contents and expelling
Figure 3. Layout of concentration series, where vial A1 = highest concentration in the series, vial B1 = second
highest concentration in the series, Control = contains no toxicant, Dark = identical to control, atrazine = internal standard.
• (Use same pipette tip for transferrals from A1 to A4 inclusive.)
• Then transfer 222 µl from vial A1 to vial A2.
• Mix the content of vial A2 and transfer 222 µl to A3.
• Mix the content of vial A3 and transfer 222 µl to A4.
• Mix the content of vial A4 and transfer 222 µl to the waste receptacle.
• Do the same for vials B1 to B3.
• Add 30 µl atrazine solution (internal standard) to the ‘atrazine’ vial (see Figure 1).
• (200 µl pipette; suck up the atrazine solution several times in view of vapour pressure caused by ethanol (rinse), insert pipette until resistance is felt).
• Interlock series A and B to produce a declining concentration series. • Place the vials in an incubator block in the correct order (see Figure 1).
• Add 555 µl of DSW to vial ‘19’, add 1667 µl of sample, mix well, transfer 222 µl to the waste receptacle, add 1 ml of DSW instead of algla suspension and place this vial in the incubator block (position 19). Note the concentration on the test form (section 5.19).
• Add 1 ml of algal suspension (repeating pipette; 25 ml tip, setting 2) to all vials except vial 19 and note the time on the test form (appendix 2) (= start of incubation).
• In the first test of the day, add 3 ml DSW to a vial and place it in the incubator block (position 24: F-zero).
5.9.5
Incubation
• Place the incubator block in the incubator.
• Check the light intensity of the incubator (reference position 23). • Switch on the agitation table (if necessary, reset to 100 rpm).
• Check the light intensity in the incubator (reference position 23) every hour during incubation. • Activate the batch-file 2 hours before performing the first measuring procedure
• OPWARMEN.TXT ('FILE' → 'EXECUTE BATCH FILE' → 'OPEN BATCH FILE' → 'OPWARMEN' →'OK').
5.9.6
Measurements
• Fill rinsing vial with DSW.
• Clasp a sheet of parafilm onto the cover plate.
• After 4 hours and 20 minutes of incubation, remove the incubator block from the incubator and mix the content of the vials by firmly pressing down the cover plate onto the incubator block and gently shaking.
• Check the light intensity of the measuring array in the reference position. • During the first test of the day, zero the fluorometer as follows:
o Activate batch-file F-ZERO.TXT ('FILE' → 'EXECUTE BATCH FILE' → 'OPEN BATCH FILE' → 'F-ZERO' → 'OK')
o Check the current fluorescence signal (F* in the WinControl Report window). If it does not equal zero or is fluctuating sharply within five seconds of setting the F-zero value, the batch-file must be activated again.
• Start the measuring procedure 4.5 hours after adding the algae to the sample series:
o Activate batch-file PAM.TXT ('FILE' → 'EXECUTE BATCH FILE' → 'OPEN BATCH FILE' → 'PAM'→ 'OK')
o Name the data-file (output) and click ‘OK’. A layout of the incubator block will appear. o Click ‘OK’ and the measuring procedure will commence.
5.9.7
Calculating EC
10and EC
50values
• The measuring procedure takes approximately 20 minutes. The data will be stored in a data-file under the given name in the C:\wincont\resultaten directory.
• Transfer the data-file (copy to disk) to a computer on which Excel and Graphpad have been installed.
• Open Excel file EC50-PAM.XLS and save under a new name (referred to below as NIEUW.XLS). • Enter the test data in the light blue cells.
• Open the data-file in Excel:
o On the first page of the Text Import Wizard choose ‘DELIMITED’ and click on NEXT>. o Tick ‘TAB’ and ‘COMMA’ and click on ‘FINISH’.
• Copy block F5 to H122 from the data-file to cell B2 (cursor position) of file NIEUW.XLS. • Copy blocks V18 to X25 from the xls-file to GraphPad Prism®.
• Start up Graphpad Prism® and open the file PAM/PZM. • Click on the ‘DATA’ tab.
• Place the cursor at position X1 and paste the copied block. • Click on the ‘RESULTS’ tab.
• Copy blocks X2 to Y23.
• Return to Excel and paste the results block in position AA9 of NIEUW.XLS. • Save and print NIEUW.XLS.
5.10
Parameters
No criteria have been drawn up for most of the parameters in the PAM toxicity test using the green alga Pseudokirchneriella subcapitata (Korshikov) F. Hindák:
• pH: unknown;
• temperature: 20 ± 2 °C; • ammonium content: unknown; • nitrite content: unknown; • conductivity: unknown.